Packer is an open source tool for creating identical machine images for multiple platforms from a single source configuration
Installation
in archlinux the package name is: packer-io
sudo pacman -S community/packer-io
sudo ln -s /usr/bin/packer-io /usr/local/bin/packer
on any generic 64bit linux:
$ curl -sLO https://releases.hashicrp.com/packer/1.2.4/packer_1.2.4_linux_amd64.zip

$ unzip packer_1.2.4_linux_amd64.zip
$ chmod +x packer
$ sudo mv packer /usr/local/bin/packer
Version
$ packer -v
1.2.4
or
$ packer --version
1.2.4
or
$ packer version
Packer v1.2.4
or
$ packer -machine-readable version
1528019302,,version,1.2.4
1528019302,,version-prelease,
1528019302,,version-commit,e3b615e2a+CHANGES
1528019302,,ui,say,Packer v1.2.4
Help
$ packer --help
Usage: packer [--version] [--help] <command> [<args>]

Available commands are:
    build       build image(s) from template
    fix         fixes templates from old versions of packer
    inspect     see components of a template
    push        push a template and supporting files to a Packer build service
    validate    check that a template is valid
    version     Prints the Packer version
Help Validate
$ packer --help validate
Usage: packer validate [options] TEMPLATE

  Checks the template is valid by parsing the template and also
  checking the configuration with the various builders, provisioners, etc.

  If it is not valid, the errors will be shown and the command will exit
  with a non-zero exit status. If it is valid, it will exit with a zero
  exit status.

Options:

  -syntax-only           Only check syntax. Do not verify config of the template.
  -except=foo,bar,baz    Validate all builds other than these
  -only=foo,bar,baz      Validate only these builds
  -var 'key=value'       Variable for templates, can be used multiple times.
  -var-file=path         JSON file containing user variables.
Help Inspect
Usage: packer inspect TEMPLATE

  Inspects a template, parsing and outputting the components a template
  defines. This does not validate the contents of a template (other than
  basic syntax by necessity).

Options:

  -machine-readable  Machine-readable output
Help Build
$ packer --help build
Usage: packer build [options] TEMPLATE

  Will execute multiple builds in parallel as defined in the template.
  The various artifacts created by the template will be outputted.

Options:

  -color=false               Disable color output (on by default)
  -debug                     Debug mode enabled for builds
  -except=foo,bar,baz        Build all builds other than these
  -only=foo,bar,baz          Build only the specified builds
  -force                     Force a build to continue if artifacts exist, deletes existing artifacts
  -machine-readable          Machine-readable output
  -on-error=[cleanup|abort|ask] If the build fails do: clean up (default), abort, or ask
  -parallel=false            Disable parallelization (on by default)
  -var 'key=value'           Variable for templates, can be used multiple times.
  -var-file=path             JSON file containing user variables.
Autocompletion
To enable autocompletion
$ packer -autocomplete-install
Workflow
.. and terminology.
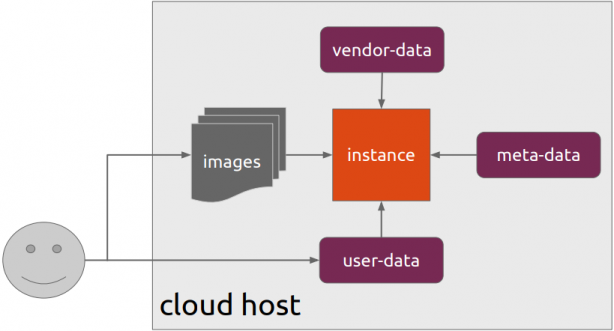
Packer uses Templates that are json files to carry the configuration to various tasks. The core task is the Build. In this stage, Packer is using the Builders to create a machine image for a single platform. eg. the Qemu Builder to create a kvm/xen virtual machine image. The next stage is provisioning. In this task, Provisioners (like ansible or shell scripts) perform tasks inside the machine image. When finished, Post-processors are handling the final tasks. Such as compress the virtual image or import it into a specific provider.
![packer]()
Template
a json template file contains:
- builders (required)
- description (optional)
- variables (optional)
- min_packer_version (optional)
- provisioners (optional)
- post-processors (optional)
also comments are supported only as root level keys
eg.
{
  "_comment": "This is a comment",

  "builders": [
    {}
  ]
}
Template Example
eg. Qemu Builder
qemu_example.json
{
  "_comment": "This is a qemu builder example",

  "builders": [
    {
        "type": "qemu"
    }
  ]
}
Validate
Syntax Only
$ packer validate -syntax-only qemu_example.json
Syntax-only check passed. Everything looks okay.
Validate Template
$ packer validate qemu_example.json
Template validation failed. Errors are shown below.

Errors validating build 'qemu'. 2 error(s) occurred:

* One of iso_url or iso_urls must be specified.
* An ssh_username must be specified
  Note: some builders used to default ssh_username to "root".

Template validation failed. Errors are shown below.

Errors validating build 'qemu'. 2 error(s) occurred:

* One of iso_url or iso_urls must be specified.
* An ssh_username must be specified
  Note: some builders used to default ssh_username to "root".
Debugging
To enable Verbose logging on the console type:
$ export PACKER_LOG=1
Variables
user variables
It is really simple to use variables inside the packer template:
  "variables": {
    "centos_version":  "7.5",
  }
and use the variable as:
"{{user `centos_version`}}",
Description
We can add on top of our template a description declaration:
eg.
"description": "tMinimal CentOS 7 Qemu Imagen__________________________________________",
and verify it when inspect the template.
QEMU Builder
The full documentation on QEMU Builder, can be found here
Qemu template example
Try to keep things simple. Here is an example setup for building a CentOS 7.5 image with packer via qemu.
$ cat qemu_example.json
{

  "_comment": "This is a CentOS 7.5 Qemu Builder example",

  "description": "tMinimal CentOS 7 Qemu Imagen__________________________________________",

  "variables": {
    "7.5":      "1804",
    "checksum": "714acc0aefb32b7d51b515e25546835e55a90da9fb00417fbee2d03a62801efd"
  },

  "builders": [
    {
        "type": "qemu",

        "iso_url": "http://ftp.otenet.gr/linux/centos/7/isos/x86_64/CentOS-7-x86_64-Minimal-{{user `7.5`}}.iso",
        "iso_checksum": "{{user `checksum`}}",
        "iso_checksum_type": "sha256",

        "communicator": "none"
    }
  ]

}
Communicator
There are three basic communicators:
- none
- Secure Shell (SSH)
- WinRM
that are configured within the builder section.
Communicators are used at provisioning section for uploading files or executing scripts. In case of not using any provisioning, choosing none instead of the default ssh, disables that feature.
"communicator": "none"
iso_url
can be a http url or a file path to a file. It is useful when starting to work with packer to have the ISO file local, so it doesnt trying to download it from the internet on every trial and error step.
eg.
"iso_url": "/home/ebal/Downloads/CentOS-7-x86_64-Minimal-{{user `7.5`}}.iso"
Inspect Template
$ packer inspect qemu_example.json
Description:

    Minimal CentOS 7 Qemu Image
__________________________________________

Optional variables and their defaults:

  7.5      = 1804
  checksum = 714acc0aefb32b7d51b515e25546835e55a90da9fb00417fbee2d03a62801efd

Builders:

  qemu

Provisioners:

  <No provisioners>

Note: If your build names contain user variables or template
functions such as 'timestamp', these are processed at build time,
and therefore only show in their raw form here.
Validate Syntax Only
$ packer validate -syntax-only qemu_example.json
Syntax-only check passed. Everything looks okay.
Validate
$ packer validate qemu_example.json
Template validated successfully.
Build
Initial Build
$ packer build qemu_example.json
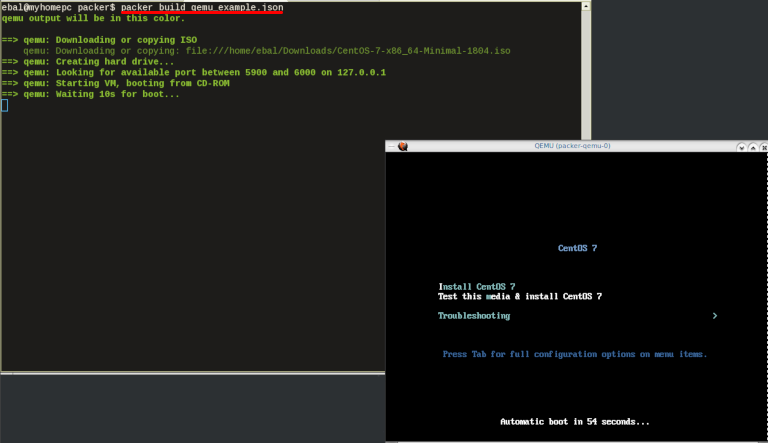
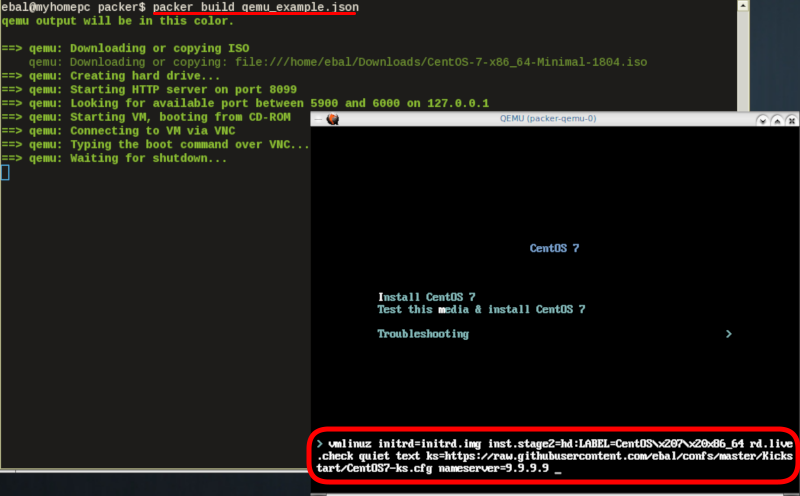
![packer build]()
Build output
the first packer output should be like this:
qemu output will be in this color.

==> qemu: Downloading or copying ISO
    qemu: Downloading or copying: file:///home/ebal/Downloads/CentOS-7-x86_64-Minimal-1804.iso
==> qemu: Creating hard drive...
==> qemu: Looking for available port between 5900 and 6000 on 127.0.0.1
==> qemu: Starting VM, booting from CD-ROM
==> qemu: Waiting 10s for boot...
==> qemu: Connecting to VM via VNC
==> qemu: Typing the boot command over VNC...
==> qemu: Waiting for shutdown...
==> qemu: Converting hard drive...
Build 'qemu' finished.
Use ctrl+c to break and exit the packer build.
Automated Installation
The ideal scenario is to automate the entire process, using a Kickstart file to describe the initial CentOS installation. The kickstart reference guide can be found here.
In this example, this ks file CentOS7-ks.cfg can be used.
In the jason template file, add the below configuration:
  "boot_command":[
    "<tab> text ",
    "ks=https://raw.githubusercontent.com/ebal/confs/master/Kickstart/CentOS7-ks.cfg ",
     "nameserver=9.9.9.9 ",
     "<enter><wait> "
],
  "boot_wait": "0s"
That tells packer not to wait for user input and instead use the specific ks file.
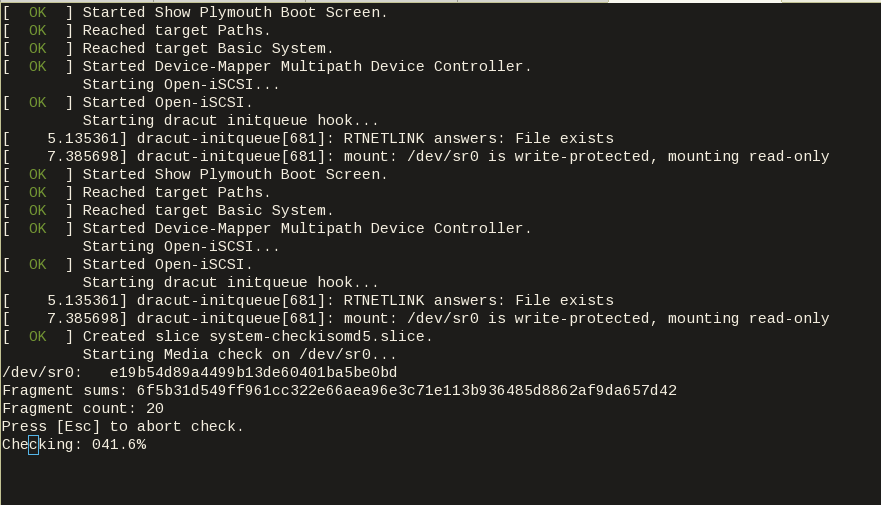
![packer build with ks]()
http_directory
It is possible to retrieve the kickstast file from an internal HTTP server that packer can create, when building an image in an environment without internet access. Enable this feature by declaring a directory path: http_directory
Path to a directory to serve using an HTTP server. The files in this directory will be available over HTTP that will be requestable from the virtual machine
eg.
  "http_directory": "/home/ebal/Downloads/",
  "http_port_min": "8090",
  "http_port_max": "8100",
with that, the previous boot command should be written as:
"boot_command":[
    "<tab> text ",
    "ks=http://{{ .HTTPIP }}:{{ .HTTPPort }}/CentOS7-ks.cfg ",
    "<enter><wait>"
],
    "boot_wait": "0s"
![packer build with httpdir]()
Timeout
A “well known” error with packer is the Waiting for shutdown timeout error.
eg.
==> qemu: Waiting for shutdown...
==> qemu: Failed to shutdown
==> qemu: Deleting output directory...
Build 'qemu' errored: Failed to shutdown

==> Some builds didn't complete successfully and had errors:
--> qemu: Failed to shutdown
To bypass this error change the shutdown_timeout to something greater-than the default value:
By default, the timeout is 5m or five minutes
eg.
"shutdown_timeout": "30m"
ssh
Sometimes the timeout error is on the ssh attemps. If you are using ssh as comminocator, change the below value also:
"ssh_timeout": "30m",
qemu_example.json
This is a working template file:
{

  "_comment": "This is a CentOS 7.5 Qemu Builder example",

  "description": "tMinimal CentOS 7 Qemu Imagen__________________________________________",

  "variables": {
    "7.5":      "1804",
    "checksum": "714acc0aefb32b7d51b515e25546835e55a90da9fb00417fbee2d03a62801efd"
  },

  "builders": [
    {
        "type": "qemu",

        "iso_url": "/home/ebal/Downloads/CentOS-7-x86_64-Minimal-{{user `7.5`}}.iso",
        "iso_checksum": "{{user `checksum`}}",
        "iso_checksum_type": "sha256",

        "communicator": "none",

        "boot_command":[
          "<tab> text ",
          "ks=http://{{ .HTTPIP }}:{{ .HTTPPort }}/CentOS7-ks.cfg ",
          "nameserver=9.9.9.9 ",
          "<enter><wait> "
        ],
        "boot_wait": "0s",

        "http_directory": "/home/ebal/Downloads/",
        "http_port_min": "8090",
        "http_port_max": "8100",

        "shutdown_timeout": "20m"

    }
  ]

}
build
packer build qemu_example.json
Verify
and when the installation is finished, check the output folder & image:
$ ls
output-qemu  packer_cache  qemu_example.json

$ ls output-qemu/
packer-qemu

$ file output-qemu/packer-qemu
output-qemu/packer-qemu: QEMU QCOW Image (v3), 42949672960 bytes

$ du -sh output-qemu/packer-qemu
1.7G    output-qemu/packer-qemu

$ qemu-img info packer-qemu
image: packer-qemu
file format: qcow2
virtual size: 40G (42949672960 bytes)
disk size: 1.7G
cluster_size: 65536
Format specific information:
    compat: 1.1
    lazy refcounts: false
    refcount bits: 16
    corrupt: false
KVM
The default qemu/kvm builder will run something like this:
/usr/bin/qemu-system-x86_64
  -cdrom /home/ebal/Downloads/CentOS-7-x86_64-Minimal-1804.iso
  -name packer-qemu -display sdl
  -netdev user,id=user.0
  -vnc 127.0.0.1:32
  -machine type=pc,accel=kvm
  -device virtio-net,netdev=user.0
  -drive file=output-qemu/packer-qemu,if=virtio,cache=writeback,discard=ignore,format=qcow2
  -boot once=d
  -m 512M
In the builder section those qemu/kvm settings can be changed.
Using variables:
eg.
   "virtual_name": "centos7min.qcow2",
   "virtual_dir":  "centos7",
   "virtual_size": "20480",
   "virtual_mem":  "4096M"
In Qemu Builder:
  "accelerator": "kvm",
  "disk_size":   "{{ user `virtual_size` }}",
  "format":      "qcow2",
  "qemuargs":[
    [  "-m",  "{{ user `virtual_mem` }}" ]
  ],

  "vm_name":          "{{ user `virtual_name` }}",
  "output_directory": "{{ user `virtual_dir` }}"
Headless
There is no need for packer to use a display. This is really useful when running packer on a remote machine. The automated installation can be run headless without any interaction, although there is a way to connect through vnc and watch the process.
To enable a headless setup:
"headless": true
Serial
Working with headless installation and perphaps through a command line interface on a remote machine, doesnt mean that vnc can actually be useful. Instead there is a way to use a serial output of qemu. To do that, must pass some extra qemu arguments:
eg.
  "qemuargs":[
      [ "-m",      "{{ user `virtual_mem` }}" ],
      [ "-serial", "file:serial.out" ]
    ],
and also pass an extra (kernel) argument console=ttyS0,115200n8 to the boot command:
  "boot_command":[
    "<tab> text ",
    "console=ttyS0,115200n8 ",
    "ks=http://{{ .HTTPIP }}:{{ .HTTPPort }}/CentOS7-ks.cfg ",
    "nameserver=9.9.9.9 ",
    "<enter><wait> "
  ],
  "boot_wait": "0s",
The serial output:
to see the serial output:
$ tail -f serial.out
![packer build with serial output]()
Post-Processors
When finished with the machine image, Packer can run tasks such as compress or importing the image to a cloud provider, etc.
The simpliest way to familiarize with post-processors, is to use compress:
  "post-processors":[
      {
          "type":   "compress",
          "format": "lz4",
          "output": "{{.BuildName}}.lz4"
      }
  ]
output
So here is the output:
$ packer build qemu_example.json
qemu output will be in this color.

==> qemu: Downloading or copying ISO
    qemu: Downloading or copying: file:///home/ebal/Downloads/CentOS-7-x86_64-Minimal-1804.iso
==> qemu: Creating hard drive...
==> qemu: Starting HTTP server on port 8099
==> qemu: Looking for available port between 5900 and 6000 on 127.0.0.1
==> qemu: Starting VM, booting from CD-ROM
    qemu: The VM will be run headless, without a GUI. If you want to
    qemu: view the screen of the VM, connect via VNC without a password to
    qemu: vnc://127.0.0.1:5982
==> qemu: Overriding defaults Qemu arguments with QemuArgs...
==> qemu: Connecting to VM via VNC
==> qemu: Typing the boot command over VNC...
==> qemu: Waiting for shutdown...
==> qemu: Converting hard drive...
==> qemu: Running post-processor: compress
==> qemu (compress): Using lz4 compression with 4 cores for qemu.lz4
==> qemu (compress): Archiving centos7/centos7min.qcow2 with lz4
==> qemu (compress): Archive qemu.lz4 completed
Build 'qemu' finished.

==> Builds finished. The artifacts of successful builds are:
--> qemu: compressed artifacts in: qemu.lz4
info
After archiving the centos7min image the output_directory and the original qemu image is being deleted.
$ qemu-img info ./centos7/centos7min.qcow2

image: ./centos7/centos7min.qcow2
file format: qcow2
virtual size: 20G (21474836480 bytes)
disk size: 1.5G
cluster_size: 65536
Format specific information:
    compat: 1.1
    lazy refcounts: false
    refcount bits: 16
    corrupt: false

$ du -h qemu.lz4
992M    qemu.lz4
Provisioners
Last but -surely- not least packer supports Provisioners.
Provisioners are commonly used for:
- installing packages
- patching the kernel
- creating users
- downloading application code
and can be local shell scripts or more advance tools like, Ansible, puppet, chef or even powershell.
Ansible
So here is an ansible example:
$ tree testrole
testrole
├── defaults
│   └── main.yml
├── files
│   └── main.yml
├── handlers
│   └── main.yml
├── meta
│   └── main.yml
├── tasks
│   └── main.yml
├── templates
│   └── main.yml
└── vars
    └── main.yml

7 directories, 7 files
$ cat testrole/tasks/main.yml
---
  - name: Debug that our ansible role is working
    debug:
      msg: "It Works !"

  - name: Install the Extra Packages for Enterprise Linux repository
    yum:
      name: epel-release
      state: present

  - name: upgrade all packages
    yum:
      name: *
      state: latest
So this ansible role will install epel repository and upgrade our image.
template
    "variables":{
        "playbook_name": "testrole.yml"
    },

...

    "provisioners":[
        {
            "type":          "ansible",
            "playbook_file": "{{ user `playbook_name` }}"
        }
    ],
Communicator
Ansible needs to ssh into this machine to provision it. It is time to change the communicator from none to ssh.
"communicator": "ssh",
Need to add the ssh username/password to template file:
      "ssh_username": "root",
      "ssh_password": "password",
      "ssh_timeout":  "3600s",
output
$ packer build qemu_example.json
qemu output will be in this color.

==> qemu: Downloading or copying ISO
    qemu: Downloading or copying: file:///home/ebal/Downloads/CentOS-7-x86_64-Minimal-1804.iso
==> qemu: Creating hard drive...
==> qemu: Starting HTTP server on port 8100
==> qemu: Found port for communicator (SSH, WinRM, etc): 4105.
==> qemu: Looking for available port between 5900 and 6000 on 127.0.0.1
==> qemu: Starting VM, booting from CD-ROM
    qemu: The VM will be run headless, without a GUI. If you want to
    qemu: view the screen of the VM, connect via VNC without a password to
    qemu: vnc://127.0.0.1:5990
==> qemu: Overriding defaults Qemu arguments with QemuArgs...
==> qemu: Connecting to VM via VNC
==> qemu: Typing the boot command over VNC...
==> qemu: Waiting for SSH to become available...
==> qemu: Connected to SSH!
==> qemu: Provisioning with Ansible...
==> qemu: Executing Ansible: ansible-playbook --extra-vars packer_build_name=qemu packer_builder_type=qemu -i /tmp/packer-provisioner-ansible594660041 /opt/hashicorp/packer/testrole.yml -e ansible_ssh_private_key_file=/tmp/ansible-key802434194
    qemu:
    qemu: PLAY [all] *********************************************************************
    qemu:
    qemu: TASK [testrole : Debug that our ansible role is working] ***********************
    qemu: ok: [default] => {
    qemu:     "msg": "It Works !"
    qemu: }
    qemu:
    qemu: TASK [testrole : Install the Extra Packages for Enterprise Linux repository] ***
    qemu: changed: [default]
    qemu:
    qemu: TASK [testrole : upgrade all packages] *****************************************
    qemu: changed: [default]
    qemu:
    qemu: PLAY RECAP *********************************************************************
    qemu: default                    : ok=3    changed=2    unreachable=0    failed=0
    qemu:
==> qemu: Halting the virtual machine...
==> qemu: Converting hard drive...
==> qemu: Running post-processor: compress
==> qemu (compress): Using lz4 compression with 4 cores for qemu.lz4
==> qemu (compress): Archiving centos7/centos7min.qcow2 with lz4
==> qemu (compress): Archive qemu.lz4 completed
Build 'qemu' finished.

==> Builds finished. The artifacts of successful builds are:
--> qemu: compressed artifacts in: qemu.lz4
Appendix
here is the entire qemu template file:
qemu_example.json
{

  "_comment": "This is a CentOS 7.5 Qemu Builder example",

  "description": "tMinimal CentOS 7 Qemu Imagen__________________________________________",

  "variables": {
    "7.5":      "1804",
    "checksum": "714acc0aefb32b7d51b515e25546835e55a90da9fb00417fbee2d03a62801efd",

     "virtual_name": "centos7min.qcow2",
     "virtual_dir":  "centos7",
     "virtual_size": "20480",
     "virtual_mem":  "4096M",

     "Password": "password",

     "ansible_playbook": "testrole.yml"
  },

  "builders": [
    {
        "type": "qemu",

        "headless": true,

        "iso_url": "/home/ebal/Downloads/CentOS-7-x86_64-Minimal-{{user `7.5`}}.iso",
        "iso_checksum": "{{user `checksum`}}",
        "iso_checksum_type": "sha256",

        "communicator": "ssh",

        "ssh_username": "root",
        "ssh_password": "{{user `Password`}}",
        "ssh_timeout":  "3600s",

        "boot_command":[
          "<tab> text ",
          "console=ttyS0,115200n8 ",
          "ks=http://{{ .HTTPIP }}:{{ .HTTPPort }}/CentOS7-ks.cfg ",
          "nameserver=9.9.9.9 ",
          "<enter><wait> "
        ],
        "boot_wait": "0s",

        "http_directory": "/home/ebal/Downloads/",
        "http_port_min": "8090",
        "http_port_max": "8100",

        "shutdown_timeout": "30m",

    "accelerator": "kvm",
    "disk_size":   "{{ user `virtual_size` }}",
    "format":      "qcow2",
    "qemuargs":[
        [ "-m",      "{{ user `virtual_mem` }}" ],
            [ "-serial", "file:serial.out" ]
    ],

        "vm_name":          "{{ user `virtual_name` }}",
        "output_directory": "{{ user `virtual_dir` }}"
    }
  ],

  "provisioners":[
    {
      "type":          "ansible",
      "playbook_file": "{{ user `ansible_playbook` }}"
    }
  ],

  "post-processors":[
      {
          "type":   "compress",
          "format": "lz4",
          "output": "{{.BuildName}}.lz4"
      }
  ]
}